Recently my friend ask me about which brand of racket that is good. Well, this simple question somehow can’t be answered that simple because we play badminton differently and our muscle are not same in strength. What good for me might not good for you.
To answer that question, I’m going to write about my “research” in buying a badminton racket or rackets.
Basic Knowledge
First, if you never play badminton and think that this sport as a fun experience but later you find out that this is not your things and you want to change to another sport, then you should borrow a strong and cheap racket. Only buy if you broke your friend’s racket!
But if you want to be a serious player, then you should buy the all-around racket as your first.
What is an all around racket? It’s a racket designed to make you play all kind of badminton games, whether to practice, playing double or single. To hit smash or to defense. The best racket for this I think is, Yonex Carbonex 21. In Yonex Chart, it was placed slightly center of the quadrant, meaning that it is the Mercedes Benz for all rackets, classic and basic to start. I don’t own one because it is kinda expensive now.
To my experience, if you start doing something with a cheap and rather toy-ish equipment you might think that yourself is a failure. Because actually price comes with quality. Take a sample of buying a guitar – if you buy the cheap ones, it can’t sound properly, the tune is slightly off and it just feels not right. Tips for you, if you are planning to buy a racket, please ask someone you know that is good in badminton to the store, and let them choose it for you. Don’t trust the seller! Afterall, a player should know what racket that is “fake/toy” or “real deal”.
Of course if you want to have a total control about buying your new racket, then continue to read.
Well then, if you happened to have played and practicing badminton for a while then you should know whether you are the kind of person who like to hit your opponent, or the one who is so humble and always receiving your opponent’s hit to your body.
If you have a tendency to be angry, then you definitely need a racket that is a head heavy. So you can kill your shuttlecock to opponents area or body. The head heavy racket make your smash hit very powerful and fast, hopefully your opponent who is also playing an attack style also using a head heavy racket, therefore their hand not quick enough to return the shuttlecock. But this kind of racket have negatives effects, they feels heavy and your swinging maneuver might not easy to perform.
I believe that a head heavy player, Oops.. I mean an attack style player should be physically strong, because if someone doing smash all the time – he or she can hurt their arms and not to mention that before the game is done, they will experience fatigue more quickly.
If you are a defense style player, then you should choose the light head racket. It means that the weight point of that racket are focused on the handle/grip. Therefore you can swing it much faster, it is a necessity to return a smash.
If you have s een a racket chart, that some racket brand provide in their website, you see that it is not that simple to choose according to your knowledge about head heavy and light head racket. Because they have many alternative to choose for.
If I want head heavy but light, is that possible? well, you can’t have it all. Alladin only have 3 wishes… but there are actually rackets manufacturers who would made such rackets, and it is for professional/athletes. Yes, it is VERY expensive, and because they have to make it more light – so they use the material that is light BUT… they are not very durable (such as Graphite and Carbon). It is OK if you are an athlete, you don’t have to buy them, they all sponsored by the maker.
Time after time, you also need to change your racket. Your muscles are developed and your skills too. So you need a new racket that can accommodate your needs. Such needs includes the flexibility of the staff, new technologies that can make the racket be strung at high tension which makes your hit more fast and more control accuracy.
Basically it is all about balance. Even an expensive racket might not good for you. Balancing your body, muscles, your skills to your rackets, and whether you play single or doubles is the right approach about choosing a racket. You should also consider these when buying a new racket: whether it is a fake, or original but licensed, is it used or new… and most importantly, does it wallet friendly to you? Does it worth to buy an expensive racket while you just want to play for sports, to make your body healthy? Winning some matches to your friend is good for your pride and your confident, but most importantly it makes you healthy… not just win the match.
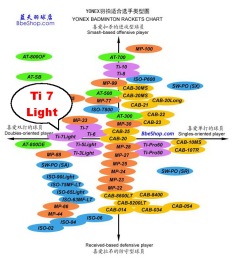
How to read the quadrant/racket chart?
Try to answer these first, is it for playing doubles or for single? for hard hitters or for defensive? do you need light or heavy racket?
Most quadrant chart are written this way, the top vertical line described as a head heavy and the opposite is head light. The left on the horizontal line is control the right one is power.
You can say that a head heavy is for offensive smash based player, while the opposite is for received base defensive player.
Note that NOT because they are defensive players, so they never hit smash. Sometimes they too perform some smashes, so therefore you will need a racket that is somewhere in the middle, in case you need to smash you still be able to have a decent attack.
Rackets in left quadrant are intended for double oriented player, so if you often plays doubles matches it is good to have the type that is in the left area. The right quadrant is for single oriented. For an example, in these days #1 female single player, Carolina Marin use a Yonex Nanoray Z Speed (NR-ZSP). Her racket type sit in the far right and at the exact line of the horizontal line. So her racket is a balance between head and light head, which is necessary for a single player. More to say, she is rather a temperamental player which need a power racket so she must pick racket that is in the right quadrant.
A double oriented player doesn’t have to pick the type that sits near the horizontal line, because there are two people in the court. Supposedly, your friend is the one who smash, and you are the one who performs netting. So your friend racket should be in the right (or exactly in the vertical line) and far upper quadrant, and yours are in the far left and below quadrant. But there are no job descriptions like that in the field, so it is better to pick a racket somewhere near the center, don’t go too extreme unless you are a professional player.
What brand should I choose?
Well, if you ask me.. first, you should choose the more famous ones such as Yonex, Li-ning, or Victor. They are the brand that most athletes use. I say that not all of other brands are no good, it happens that not many store are selling unfamous ones – because they don’t sell well. The not famous one usually more cheap and have all the technologies that a branded one use, probably even made in the same factory too.
Secondly, if the rackets comes within the same years then the technology are about the same in racket manufactures. They just advertised with different names. You will discover that IT SEEMS they are the same technologies, yet came with names such as nanotec or nanotube, x-fullerene or pyrofil, etc. So, don’t be too confused about choosing, they basicly are the same, the differences are in the combinations to apply those technologies in a single racket.
Of course you will not find exactly the same feature in different brand. The high class one (more expensive) usually have more than three features to be applied in their rackets line/types, they combine the technologies and features.
Different brands combines those technologies or features differently, to get you even more confused. But mostly if the racket’s price is slightly competitive in price, they have the same CLASS. (if the brands are the famous ones). Lower price means they applied three or less technologies they have, higher price means they combine more of their technologies on each rackets.
What is this Grip size, Light-heavy, Flexible or Stiffness?
Most racket that are sold in store comes with G4 and 3u. They are the code for grip and weight. G4 are grip four, G3 are grip three. The smaller the number, the larger the grip. 3U, 4U are the lightness… the bigger the number, the less weight the racket is. (for the grip size, it is possible to remove the original grip towel just to make it smaller and regrip it with the thicker towel to make it larger so the G number is not really that important)
Flexible or stiff? it is the information for the staff, the more flexible means you will return your opponent hits easily because it will bounce easily. It means a light touch of the shuttlecock with this racket can make it fly more far or higher, small effort – big result. But they are hard to control because the staff is slightly bend, therefore your shuttlecock might not approach the spot that you want. Most of the expensive and advanced racket have a stiff staff, and not all of the more expensive one are light in weight. I was pretty surprised myself with this fact, an original racket which is use by #1 male athlete (such as Yonex Voltric Z-Force II) are actually heavy in my hand.
According to my friend if you happened not to like the stiffness of your racket’s staff, then you can compromise it by strung it slightly little under tension. Meaning that if the chart said it can be strung to 26 lbs, you should strung it at 25 or 24 lbs just to make it more bouncy. Once again, it is all about balance. Athlete’s racket might be heavy in my hand but to them which were practicing everyday – it may not. If your hand are strong, then a light racket might get your shuttlecock goes outside the court more often.
How to Finalize my Decision?
You can not judge the racket is suits you or not just by looking at it. You have to try it, unfortunately 99% of the store won’t strung their new racket moreover let you try it in the court. So, it is best if you borrow your friend’s racket first. If it suits you, then buy the same brand and type. But mostly you will not find it in the store if the racket was produced a couples of years ago. (1% is if you have your own sport store)
But do not worry, most store allow you to grip and swing their new racket so you have the “feel” about that racket. What you need to know is that, the new racket is not always comes with the string. They shipped without the string, so if you swing the unstrung racket, I’m sure it will feel slightly different once it is strung. Moreover, some rackets come without strings but replaced by a piece of cardboard with some athletes faces on it… do not try to swing with that cardboard on, it may ripped and you are forced to buy because you broke it.
Already confuse now? don’t be, you just need to experiment about other rackets that your friend has, look it up in the internet what position your friend’s racket in the chart, so you will find that if it suit you or not, it was a heavy head or not? Then you just take your feeling to guide you. Personally I like a racket that is light but I also an attack style player, so I would search racket that is in the left and slightly upper quadrant.
Yes, another unfortunate that nowadays the maker don’t use chart and quadrant anymore but they use a column to describe their rackets. But you’ll have the idea to choose.
Fake or Original, Licensed or not – used or new?
I would say, go with your budget. A Yonex racket was widely counterfeited, so you should buy this brand in local store, or buy from trusted and official internet site for their brand. Some trick can be applied to determined that is a “real” one, Yonex’s company provide such glasses that is available in sport store that sell Yonex’s rackets (looks like a 3D cardboard glasses), to see the holograms which they install on every of their new rackets. The color of the “fake” holograms will not appear so rainbow like compare to the original ones.
If they don’t come with any holograms, maybe it is a fake ones, or maybe it is original but the hologram is missing, after all it is just a sticker. Then what? I think you should be suspicious, but if you believe the seller – you should try to feel the delicacy of the paint job and the printings logo, don’t forget to see the bottom of the grip too. Most of the fake one’s do not bother to take special care in printing or painting their fake rackets, they just have to make it cheaper so to maximize profit. While the original makers take serious consideration about their quality of their products.
There are people who sell fake ones with higher price, so don’t judge the fake or the real one by it’s price. You should suspicious if the price is rather too cheap if they say it is original. (see the distribution website for the recommended price)
Licensed one or not? A licensed ones are a product that might be produce by different factory but they buy a license from the original maker. You see that even i-phone too are produced in China, it is original not the fake ones. They do that to make it cheaper in distribution and in the raw material. Most people that I know think that a licensed ones are not as good as the real one when it comes to be use in game match. I don’t know exactly what is the different, but I guess the feeling of handling the racket is not the same. For example, Carbonex 21 made in Japan in my town priced about one million rupiahs (S100), but the Taiwan’s made are only two hundred and fifty thousand rupiahs ($25). The seller said that this Taiwan’s made is original but licensed from Yonex. Of course the seller said that it is the same when it comes in playing. But what do you think?
Most serious player won’t buy the licensed, moreover the fake ones.
Used or new? I bought secondhand’s one twice, and I did that from online seller without even touch the racket. I just ask the seller to make a decent photos of their used racket, I asked if they are originals or not and ask if they have a crack or not. I was speculated at that time, a little bit worried and a lot of prays too – but the main reason that I dare to buy it is that it is not cost me more than half of million rupiahs (below 50 USD). So, I think if it turns out the racket is bad I just consider that I buy a fake one too expensive. But if it is not, I might have an original which ones was priced about 100 dollar at the time it was released, so it was cheap and you get the original.
Buy a new one if you already decide and know what you need. Buy a used one if you are going to retired from badminton in a couple of years, or want a backup racket in case something happend to your main racket. I suggest you go to local store, asked them if they have a used one in their store, usually they do.
The advantages of buying a used one is that for the price of licensed one, you get the original – which I think it is much more “tuned” than the licensed or the fake one. The disadvantage is that you never know the “history” of that racket, maybe it got an accident and got it repaired? who knows.
Buying a fake one is OK too, if you are just a beginner or your budget is tight. The fake one still can be use to win some match, otherwise it is sell in toy store rather in sport store. An expensive and the original one’s can broke too after hit some hard smash, some people say because it was strung by untrained employee so the tensions that were used are vary or maybe it was a defect in manufacturing. To my experience, my original rackets have been hits other rackets while play doubles and been hitting floors too many times and are still not crack, just paint chips all over.
So if the original can be broken in rare case I assumed, what about the fake one’s? I examine my friend racket that is the fake one, the shape of racket head before and after it strung are distorted – so I guess the fake one is not as strong as the original one. In my opinion, if you buying the fake one, don’t strung at the tension that is written in the chart, rather have it strung to lower tension.
Is it too Expensive?
Lastly, buying a racket is just like buying tools. A good tools paid for itself, did you ever buy a cheap screwdriver that were bend when you try to open some stuck screws?
Think of it this way, if you are an athlete you need a tool to work, if you are a woodworker you need tools to work. A lousy tools makes you work longer and might get you frustrated, therefore you are not happy. So, two million rupiahs ($200) for the tool that you will keep using everyday or everyweek – it is worth to consider. To me, if you just play for sport, maybe aroun one million rupiahs is pretty decent ($100). Just remember if you bought the expensive ones, try not to hit other rackets with it.
I believe satisfaction is more important than a wallet friendly, it is a tool for your health – just like a computer you HAVE TO buy, in order to make money. A racket is a tool you have to buy in order to make you healthy.
PS: Here’s a link to get more information about badminton, it’s from brand name Victor’s website. http://victor.fi/images/Tiedostot/PDF/BM.pdf

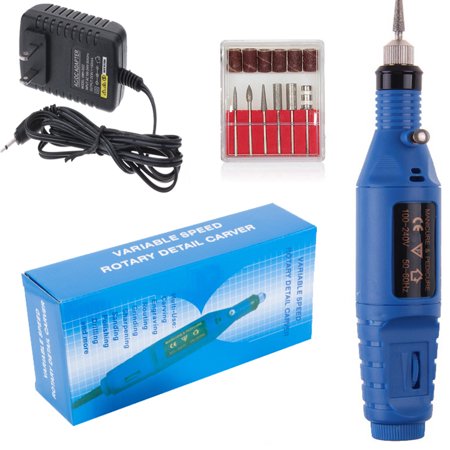 I always love a mini drill. My first tool is supposed to be a manicure tool which came with little drum sander. Unfortunately because I bought the cheapest from online store, it’s speed controller is not function.
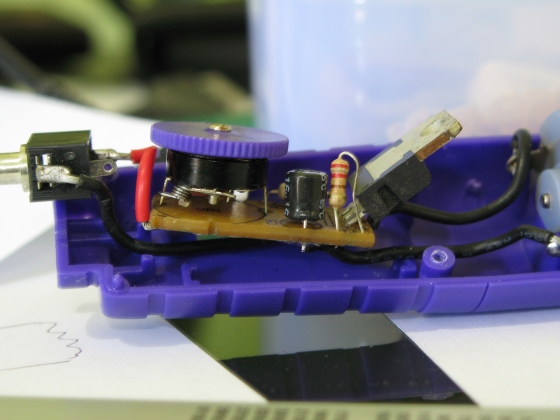


 ught a new car, it’s Honda Brio. Usually we add some hook behind the driver’s seat (like this one on the right) – so when we buy take home food they don’t fall out and make a mess inside.


 lighter. I got the light version (
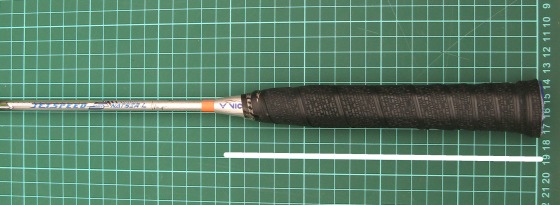
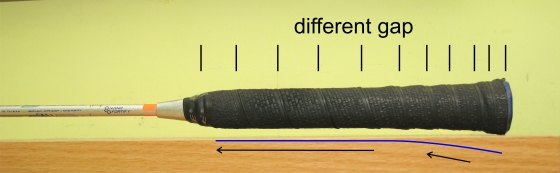
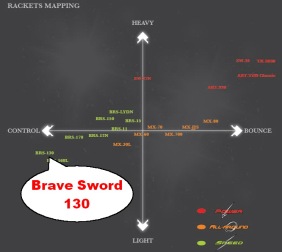 Victor’s chart is position in far left and little below from the horizontal bar in the quadrant. So I guess, it is pretty much like Yonex Ti-7 in the chart, it just more light. I did curious about the weight, so I took a digital measurement and the weight just 2 grams different which the Victor’s is more heavy. But, probably that is because the hand towel factor. Also I noticed in comparison of the length, the Victor’s have longer wood handle so in total, this racket have 2 cm more length than Yonex’s. I dunno is that